- Xperience by Kentico
How to Send Notification Emails with Form Data in Xperience by Kentico
In this article, I will guide you through the process of setting up a notification email to be sent with form data whenever a visitor submits a form in Xperience by Kentico.
I may sound a bit nostalgic 👴, but this could have been done in older versions of Kentico with just a couple of clicks in the Admin. In Xperience by Kentico, however, sending a notification email with submitted form data when a visitor submits a form requires more effort, including writing custom code.
To clarify the terminology, I will use the terms notification and autoresponder. By notification email, I mean an email sent from Xperience by Kentico to a specified email address. A real-world scenario would be a business owner receiving an email when a potential customer submits a contact form on their website. By autoresponder, I mean the Xperience by Kentico feature that ensures emails are sent when a form is submitted.
My goal 🥅 is to guide you through the entire process, starting from scratch. This includes:
- Setting up SMTP for your project
- Preparing your solution for customization
- Creating a form with a dummy autoresponder
- Preparing the content type and item for autoresponder settings
- Implementing a custom autoresponder
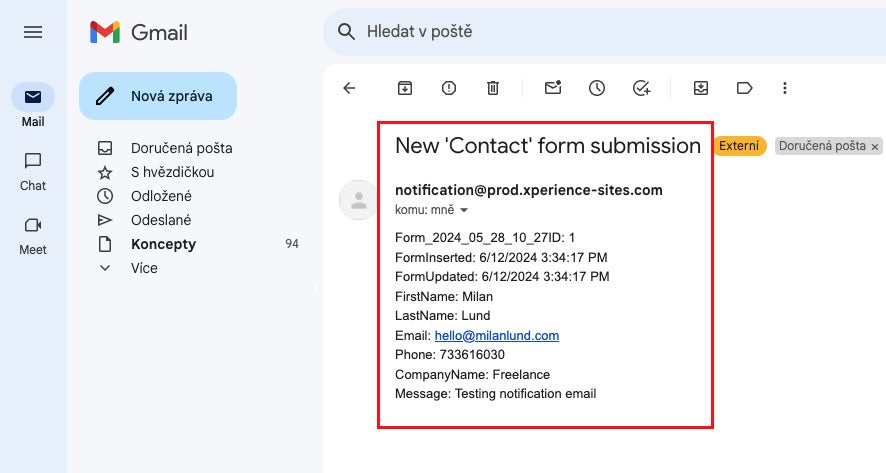
- Submitting a form and obtaining the email
By "starting from scratch," I mean having at least a clean Xperience by Kentico project created from a template. Let's begin.
Setting Up SMTP for Your Project
As we will be sending emails, we need to ensure our project can connect to an SMTP server. If you have an SMTP server, get your credentials 🔑 and create a new section in your appsettings.json file.
{
...
"SmtpOptions": {
    "Server": {
      "Host": "<your SMTP server URL>",
      "UserName": "<your username>",
      "Password": "<your password>",
      "Port": <port number>,
    }
  }
...
}
Next, you need to modify your Program.cs file to add these settings to your application. If you host your website on Kentico's SaaS, ensure your SMTP settings are applied only outside the SaaS environment. For Kentico's SaaS, you'll need to set up SendGrid, which comes automatically with Kentico's SaaS.
if (builder.Environment.IsQa() || builder.Environment.IsUat() || builder.Environment.IsProduction())
{
    builder.Services.AddXperienceCloudSendGrid(builder.Configuration);
}
else
{
    builder.Services.Configure<SmtpOptions>(builder.Configuration.GetSection("SmtpOptions")).AddXperienceSmtp();
}
Of course, if you prefer processing your emails differently, Kentico provides other options for delivering your emails.
Preparing Your Solution for Customization
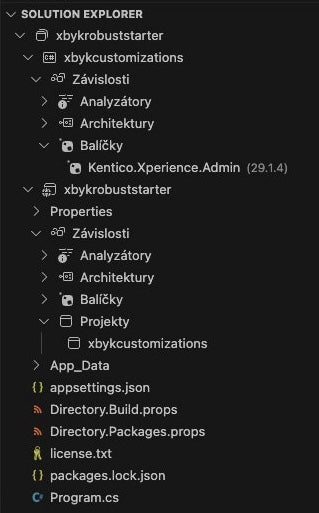
The notification email will be implemented as a custom form autoresponder. This means it will be a customization to your solution. Kentico recommends creating this as a separate Class Library project, so you need to prepare your projects accordingly. You can follow:
- The official documentation, and/or
- My article on preparing a solution for customization on macOS.
Ultimately, you should have a solution structure like this:
Creating a Form with a Dummy Autoresponder
To send a notification email with form data, we need a form. We will create a Contact form, as it represents a real-world scenario.
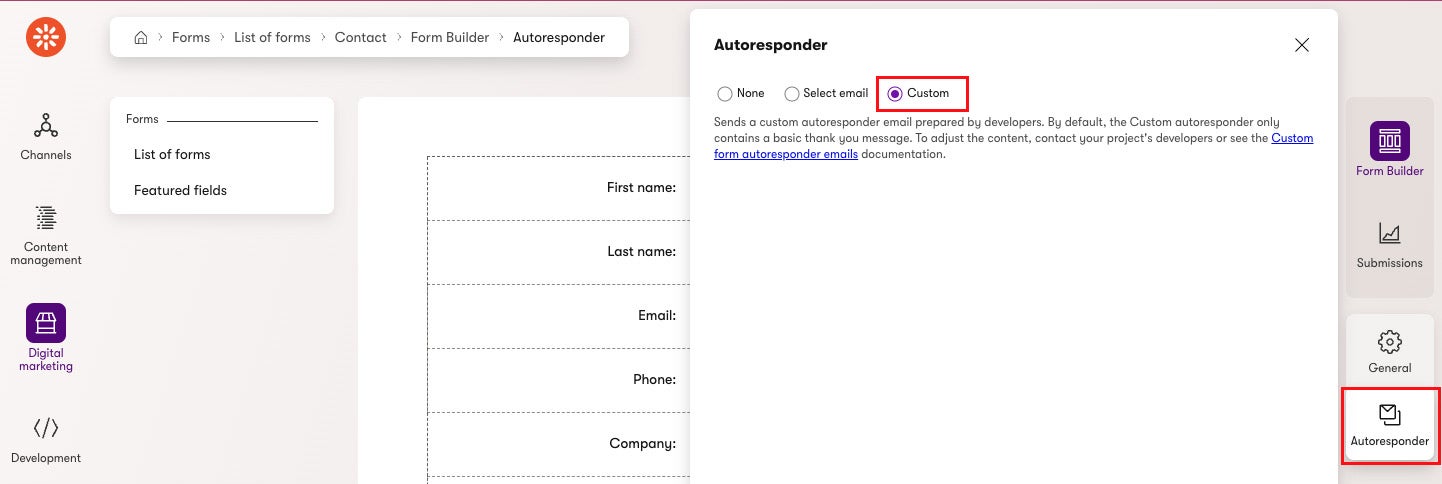
Open your Xperience by Kentico Admin, go to the Forms application, and create a new form. Name it "Contact" and add a few fields typically seen in such forms. The key step here is to select a Custom autoresponder. This ensures that Xperience by Kentico sends a dummy email, which we can override with a custom one later.
Preparing the Content Type and Item for Autoresponder Settings
Our notification emails ✉️ need to know which form they are related to. Also, knowing the From and To addresses is beneficial for ensuring email delivery. To avoid hardcoding these settings in the customization code, and since Xperience by Kentico does not offer a default option for this, a reasonable approach is to store this configuration as a content item.
Creating the Content Type
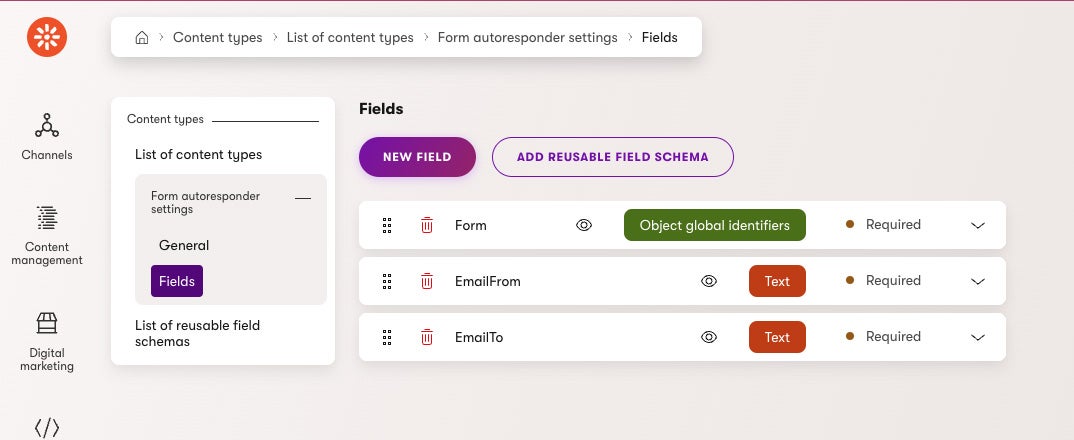
Go to the Content types application, create a new content type, and fill in the following details:
- Content type name: Form autoresponder settings
- Namespace: [Your namespace] (e.g., Project)
- Name: FormAutoresponderSettingsReusableContent
- Use for: Reusable content
- Short code name: ProjectFormAutoresponderSettingsReusableContent
Then, add the following fields:
- Form selection field:
- Field name: Form
- Data type: Object global identifiers
- Set as Required
- Field caption: Form
- Form component: Object GUID selector
- Object type: CMS.Form
- Maximum items: 1
- From address field:
- Field name: EmailFrom
- Data type: Text
- Set as Required
- Field caption: From
- Form component: Text input
- Validation: Email format
- To addresses field:
- Field name: EmailTo
- Data type: Text
- Set as Required
- Field caption: To
- Form component: Text input
- Validation: Email format (ensure the Allow multiple email addresses option is selected)
Creating the Content Item
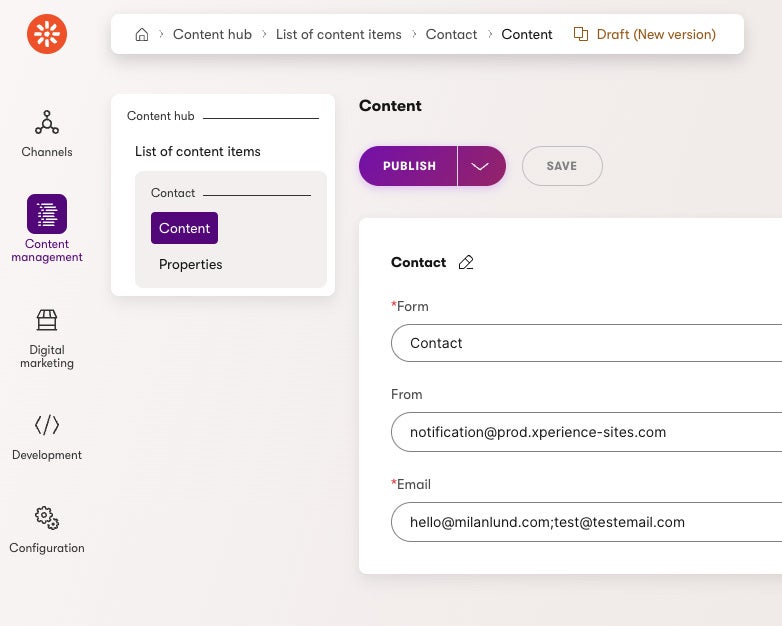
Based on the newly created content type, create an item that will serve as the configuration ⚙️ for our form notification email. Go to the Content hub, create a new content item based on the Form autoresponder settings content type, and fill in the fields:
- Form: Select the form we created
- From: Enter an email address from a verified domain on your SMTP server to ensure delivery
- To: Enter the recipient email addresses, separated by semicolons
This approach allows editors to configure notification emails directly from the Admin interface.
Implementing a Custom Autoresponder
Now we get to the exciting part ⚡. To turn the dummy autoresponder email into our real notification email, we need to implement the following logic:
- When any form is submitted, our logic is triggered automatically.
- Access the submitted form details to:
- Retrieve all content items based on the Form autoresponder settings content type and find the ones related to the form.
- If no settings are available, no email is sent.
- Access the submitted form data and iterate through it, creating a body string containing field names and values, each separated by a new line.
- Using the From and To addresses from the settings and the email body, compose the email subject and send the email.
Go to your code and in the customization project, create a new FormSubmitAutomationEmailProvider.cs file. The code to implement this follows:
using CMS;
using CMS.ContactManagement;
using CMS.OnlineForms;

using CMS.Automation;
using CMS.ContentEngine;
using Newtonsoft.Json;
using CMS.Core;

[assembly: RegisterImplementation(typeof(IFormSubmitAutomationEmailProvider), typeof(Custom.CustomFormSubmitAutomationEmailProvider))]

namespace Custom;

public class AutoresponderSettingsModel
{
    public required List<string> Recipients { get; set; }
    public string? Sender { get; set; }
}

public class CustomFormSubmitAutomationEmailProvider : IFormSubmitAutomationEmailProvider
{
    private readonly IContentQueryExecutor contentQueryExecutor;
    private readonly IEventLogService eventLogService;
    public CustomFormSubmitAutomationEmailProvider(IContentQueryExecutor contentQueryExecutor, IEventLogService eventLogService)
    {
        this.contentQueryExecutor = contentQueryExecutor;
        this.eventLogService = eventLogService;
    }

    // This method is called automatically when a form is submitted
    public async Task<AutomationEmail?> GetEmail(BizFormInfo form, BizFormItem formData, ContactInfo contact)
    {
        // Get the autoresponder settings for the form
        var settings = await GetAutoresponderSettingsAsync(form);

        // If settings are not found, log an error and send no email
        if (settings == null)
        {
            eventLogService.LogError("Form autoresponder email", "FORMAUTORESPONDER", eventDescription: "Unable to retrieve autoresponder settings for form");
            return null;
        }

        // Build the email body by iterating over the form fields
        string body = "";
        foreach (var field in formData.ColumnNames)
        {
            string fieldValue = System.Net.WebUtility.HtmlEncode(formData.GetStringValue(field, ""));
            body += $"{field}: {fieldValue}<br>";
        }

        // Send the email
        return new AutomationEmail
        {
            Subject = $"New '{form.FormName}' form submission",
            Body = body,
            Sender = settings.Sender,
            Recipients = settings.Recipients
        };
    }

    private async Task<AutoresponderSettingsModel?> GetAutoresponderSettingsAsync(BizFormInfo form)
    {
        // Query all content items of type 'Project.FormAutoresponderSettingsReusableContent' to get the autoresponder settings
        var builder = new ContentItemQueryBuilder()
            .ForContentType("Project.FormAutoresponderSettingsReusableContent",
                config => config
                    .WithLinkedItems(2));

        var contentItems = await contentQueryExecutor
            .GetResult(builder: builder, resultSelector: rowData =>
            {
                return rowData;
            });

        // Iterate over the content items to find the settings for the current form
        foreach (var item in contentItems)
        {
            var guid = item.GetValue<string>("Form");
            if (guid != null)
            {
                IEnumerable<string>? guids = JsonConvert.DeserializeObject<IEnumerable<string>>(guid);
                var row = guids?.Where(x => x == form.FormGUID.ToString()).FirstOrDefault();
                if (row != null)
                {
                    AutoresponderSettingsModel settings = new AutoresponderSettingsModel
                    {
                        // Split emails by semicolon and remove any leading/trailing whitespace
                        // Semicolon is required by XbyK as its input validation does not allow other separators
                        Recipients = item.GetValue<string>("EmailTo").Split(';').Select(x => x.Trim()).ToList(),
                        Sender = item.GetValue<string>("EmailFrom")
                    };

                    return settings;
                }
            }
        }

        return null;
    }
}
The Xperience by Kentico documentation provides additional context on the implementation details and also offers a simpler example with hard-coded values.
Submit a Form and Obtain the Email
At this stage, everything should be ready for testing 👨🔬. To test the setup, place a Form widget onto a page in your Website channel and publish the page. Then, go to the live site and submit the form. If a notification email arrives, you have successfully completed the setup. If not, inspect the Email queue and Event log applications for any possible issues, or check your SMTP server to ensure the email could make it through.
Conclusion
Hopefully, we have successfully set up an SMTP server in our Xperience by Kentico project, created a form with autoresponder settings stored in a content item, and implemented the logic to send a notification email with the data submitted in a form.
About the author
Milan Lund is a Freelance Web Developer with Kentico Expertise. He specializes in building and maintaining websites in Xperience by Kentico. Milan writes articles based on his project experiences to assist both his future self and other developers.
Find out more